3 Tips for Seasoning & Searing Steak Like a Chef
Good meat doesn’t come cheap, so let’s not screw it up. Our man Mike spent over 18 years slinging hash and jockeying pans in the best of Canada’s eateries—he knows a thing or two about a thing or two when it comes to cooking a steak. So what does Mike do when it’s rainy outside, or he forgot to grab charcoal on the way home? He busts out a big ol’ pan and sears his steak like a pro.
The best thing about Mike’s technique is that it can be used on any piece of meat destined for the grill. Get used to talking to your butcher and asking for their recommendations; they want you to be happy and will offer the best when asked—sometimes that’s a ribeye, sometimes it's a bone-in pork chop—get the best you can afford. Steaks are a treat, and you deserve it.

Step One: Seasoning & Aging
Salt has more than one job. Sure, it makes food taste more like it is supposed to, but it also helps move moisture around—don’t believe me, revisit your high school biology notes on osmosis—by liberally seasoning your steak ahead of time, salt will pull some of the extra water out and intensify flavour. It’s important to use the right kind of salt. Don’t use too fine or too coarse a salt, Kosher salt is A-OK, so is a sea salt or something similar out of your grinder.
Once your steak is seasoned, you want to put it uncovered in the fridge so that air can circulate around it. Arnest prep pans with the basket insert are perfect for this; air can flow on all sides of the meat, gently drying it out and allowing moisture to drip below. Think of this as a cheater’s dry-age; it’s not as good as the real thing, but much better than nothing. A dry surface will also help the steak sear much better.
Now find something else to do. You’re having this for dinner tomorrow.

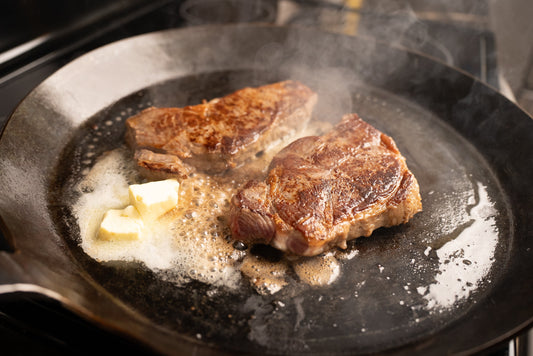
Step Two: Searing
A quality sear relies on a whole bunch of little things going your way, so we’re going to do our best to control the things we can.
Start by taking your meat from the fridge and letting it come up to room temperature, likely an hour or two before you intend on cooking it. Don’t be alarmed by the deeper red colour, it's a good thing. Pat it dry with a paper towel and get your pan on the heat.
No matter the stovetop, put a heavy-bottomed pan on medium heat. Usually I like to break out the cast-iron for this, but lately I’ve been rocking a Turk pan, a hunk of steel forged into an awesome sauté pan. They heat up faster than cast-iron but maintain an even cooking surface better than other pans. Coat the bottom with your oil of choice (nothing too smokey please) and make sure it’s hot, but not hot enough to catch fire, before adding the steak.
Cooking in a pan is rarely a passive activity. We gotta worry about temperature control and make sure the meat is in constant contact with the pan—Mike likes to apply a smidge of force to the steak with a spoon to prevent it from curling up, but I prefer a Chef’s Press because I’m probably doing a dozen other things in the kitchen by now. Keeping some downward pressure is going to ensure an even sear. It’s hard to tell you how long to cook per side because I don’t know what kind of meat you bought or how you like it, but I can suggest keeping an eye on the edge of the steak and watching the heat creep its way up. Once you achieve a tasty crust, flip it over, add some aromatics and butter to the pan if you’re so inclined and baste away. Use a thermometer or whatever doneness test you prefer, and remove the steak from the pan once you’re happy.

Step Three: Resting
I think this is the most important step towards a successful steak night—giving protein a chance to chill out after the traumatic experience of being thrown into sizzling oil is key—heat causes muscles to contract and constrict, that’s why a freshly grilled striploin leeches juice all over your cutting board when you slice it; letting it relax will loosen things up and keep the fatty goodness where it's supposed to be. Give your prep pan a good scrub and let the steak rest in the basket so it doesn’t sit in a red puddle.
A piece of meat, no matter the size, should rest for about 50% of the time it took to cook. A rested steak is going to be juicier and more tender—even if you overcook it a smidge—and it gives you time to whip up a pan sauce or sesame-garlic butter like Mike did. Don’t worry if the steak cools down, a piping hot demi-glace is going to fix that.

Final Step: Slicing & Munching
I bet you were wondering when I was going to bring up knives, this is Knifewear after all. Unless you are the proud owner of some amazing steak knives (non-serrated, of course), you’re going to want to slice your steak before it hits the plate. A sharp knife will leave things silky smooth in your mouth, dull or serrated ones leave it feeling like someone already chewed your dinner for you.
Drizzle a little sauce, fling around some cracked black pepper and finishing salt, and tuck in. A classic Friday move is to hit up the fancy grocery store on my way home, grab whatever looks good from the butcher, and the fixings for a caesar salad. Meat plus salad always wins.